特征工程是机器学习流程中重要的一个环节,即使是通常用来做端到端学习的深度学习模型在训练之前也免不了要做一些特征工程相关的工作。Tensorflow平台提供的FeatureColumn API为特征工程提供了强大的支持。
Feature cloumns是原始数据和Estimator模型之间的桥梁,它们被用来把各种形式的原始数据转换为模型能够使用的格式。深度神经网络只能处理数值数据,网络中的每个神经元节点执行一些针对输入数据和网络权重的乘法和加法运算。然而,现实中的有很多非数值的类别数据,比如产品的品牌、类目等,这些数据如果不加转换,神经网络是无法处理的。另一方面,即使是数值数据,在仍给网络进行训练之前有时也需要做一些处理,比如标准化、离散化等。
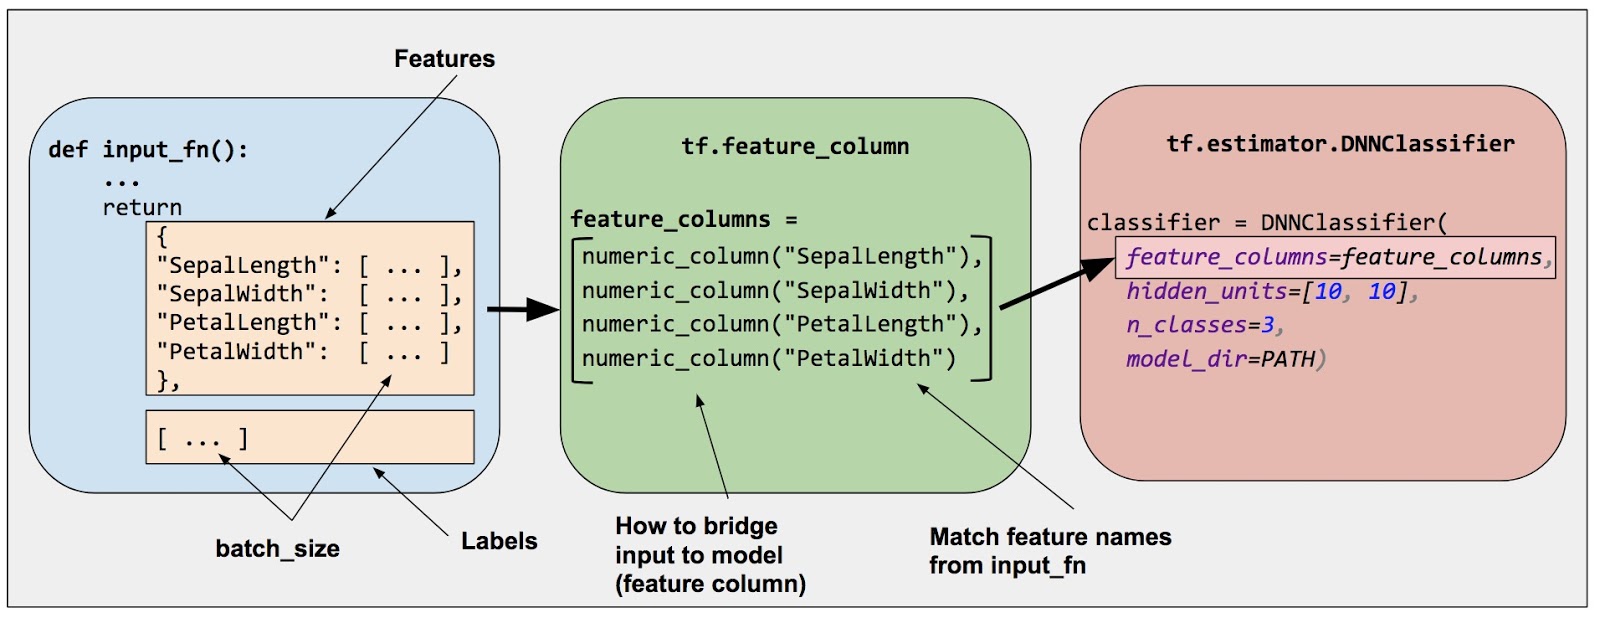
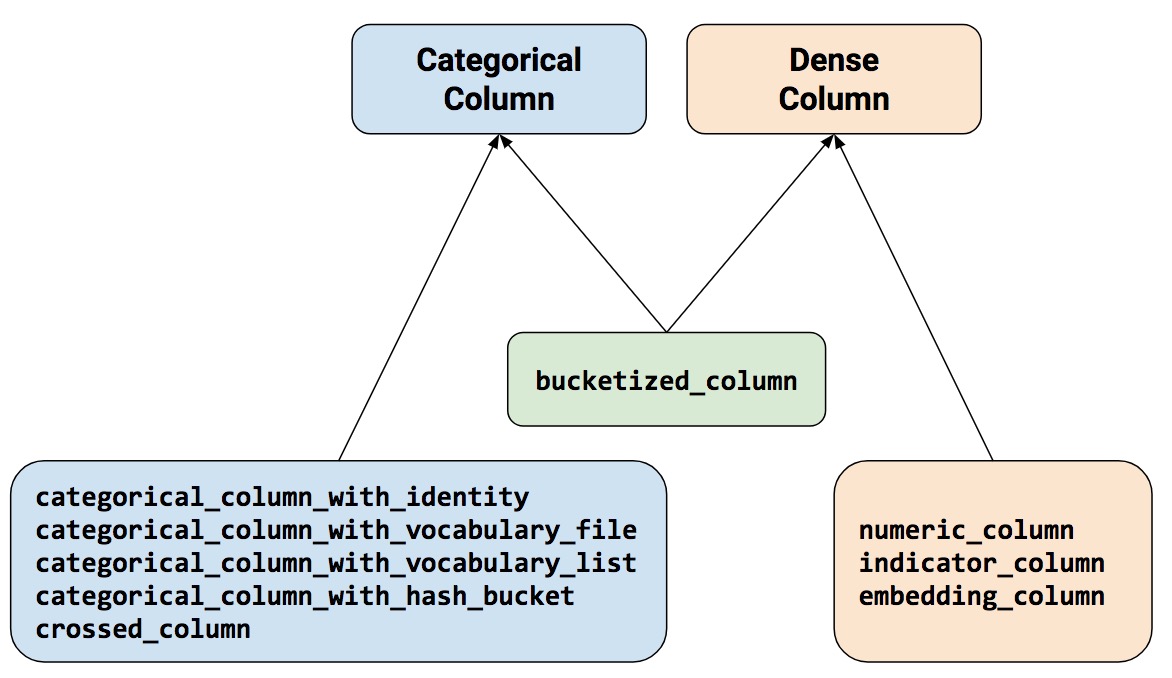
在Tensorflow中,通过调用tf.feature_column模块来创建feature columns。有两大类feature column,一类是生成dense tensor的Dense Column;另一类是生成sparse tensor的Categorical Column。具体地,目前tensorflow提供的feature columns如下图所示。
Numeric column
1 | tf.feature_column.numeric_column( |
- key: 特征的名字。也就是对应的列名称。
- shape: 该key所对应的特征的shape. 默认是1,但是比如one-hot类型的,shape就不是1,而是实际的维度。总之,这里是key所对应的维度,不一定是1.
- default_value: 如果不存在使用的默认值
- normalizer_fn: 对该特征下的所有数据进行转换。如果需要进行normalize,那么就是使用normalize的函数.这里不仅仅局限于normalize,也可以是任何的转换方法,比如取对数,取指数,这仅仅是一种变换方法.
创建numeric column的方法如下:1
2# Represent a tf.float64 scalar.
numeric_feature_column=tf.feature_column.numeric_column(key="SepalLength", dtype=tf.float64)
默认情况下,numeric column创建的是一个标量值,也可以指定shape参数来创建向量、矩阵等多维数据。1
2
3
4
5# Represent a 10-element vector in which each cell contains a tf.float32.
vector_feature_column = tf.feature_column.numeric_column(key="Bowling", shape=10)
# Represent a 10x5 matrix in which each cell contains a tf.float32.
matrix_feature_column = tf.feature_column.numeric_column(key="MyMatrix", shape=[10,5])
我们还可以为numeric column指定数值变换的函数normalizer_fn,为对原始数据做一些变换操作。可以使用下面的代码测试numeric column的效果。1
2
3
4
5
6
7
8
9
10
11
12
13
14
15
16
17
18
19
20
21
22
23import tensorflow as tf
from tensorflow import feature_column
from tensorflow.python.feature_column.feature_column import _LazyBuilder
def test_numeric():
price = {'price': [[1.], [2.], [3.], [4.]]} # 4行样本
builder = _LazyBuilder(price)
def transform_fn(x):
return x + 2
price_column = feature_column.numeric_column('price', normalizer_fn=transform_fn)
price_transformed_tensor = price_column._get_dense_tensor(builder)
with tf.Session() as session:
print(session.run([price_transformed_tensor]))
# 使用input_layer
price_transformed_tensor = feature_column.input_layer(price, [price_column])
with tf.Session() as session:
print('use input_layer' + '_' * 40)
print(session.run([price_transformed_tensor]))
test_numeric()
执行后的输出为:1
2
3
4
5
6
7
8
9[array([[3.],
[4.],
[5.],
[6.]], dtype=float32)]
use input_layer________________________________________
[array([[3.],
[4.],
[5.],
[6.]], dtype=float32)]
Bucketized column
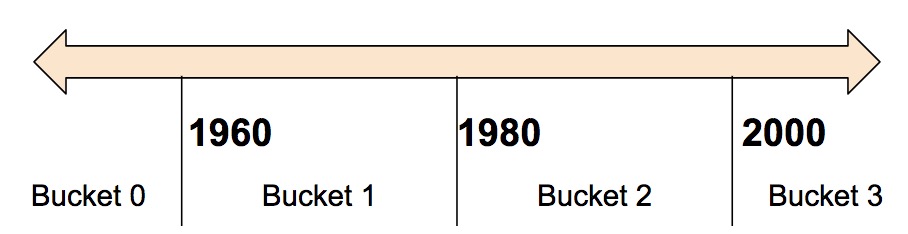
Bucketized column用来把numeric column的值按照提供的边界(boundaries)离散化为多个值。离散化是特征工程常用的一种方法。例如,把年份离散化为4个阶段,如下图所示。
1 | tf.feature_column.bucketized_column( |
- source_column: 必须是numeric_column
- boundaries: 不同的桶。boundaries=[0., 1., 2.],产生的bucket就是, (-inf, 0.), [0., 1.), [1., 2.), and [2., +inf), 每一个区间分别表示0, 1, 2, 3,所以相当于分桶分了4个.
1 | # First, convert the raw input to a numeric column. |
按照上述代码,可以把Year字段离散化为下表所示的结果。
| Date Range | Represented as… |
|---|---|
| < 1960 | [1, 0, 0, 0] |
| >= 1960 but < 1980 | [0, 1, 0, 0] |
| >= 1980 but < 2000 | [0, 0, 1, 0] |
| >= 2000 | [0, 0, 0, 1] |
我们可以进一步做一些测试:1
2
3
4
5
6
7
8
9def test_bucketized_column():
price = {'price': [[5.], [15.], [25.], [35.]]} # 4行样本
price_column = feature_column.numeric_column('price')
bucket_price = feature_column.bucketized_column(price_column, [10, 20, 30, 40])
price_bucket_tensor = feature_column.input_layer(price, [bucket_price])
with tf.Session() as session:
print(session.run([price_bucket_tensor]))
test_bucketized_column()
测试结果为:1
2
3
4[array([[1., 0., 0., 0., 0.],
[0., 1., 0., 0., 0.],
[0., 0., 1., 0., 0.],
[0., 0., 0., 1., 0.]], dtype=float32)]
Categorical identity column
与Bucketized column类似,Categorical identity column用单个唯一值表示bucket。1
2
3
4
5# Create categorical output for an integer feature named "my_feature_b",
# The values of my_feature_b must be >= 0 and < num_buckets
identity_feature_column = tf.feature_column.categorical_column_with_identity(
key='my_feature_b',
num_buckets=4) # Values [0, 4)
上述代码可以生成下图所示的效果。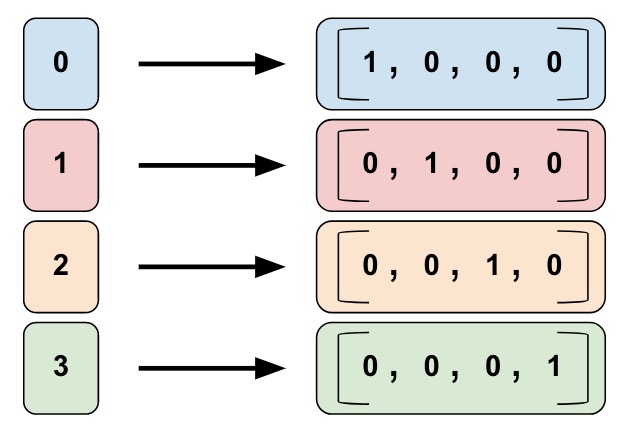
Categorical vocabulary column
顾名思义,Categorical vocabulary column把一个vocabulary中的string映射为数值型的类别特征,是做one-hot编码的很好的方法。在tensorflow中有两种提供词汇表的方法,一种是用list,另一种是用file,对应的feature column分别为:
- tf.feature_column.categorical_column_with_vocabulary_list
- tf.feature_column.categorical_column_with_vocabulary_file
两者的定义如下:1
2
3
4
5
6
7tf.feature_column.categorical_column_with_vocabulary_list(
key,
vocabulary_list,
dtype=None,
default_value=-1,
num_oov_buckets=0
)
- key: feature名字
- vocabulary_list: 对于category来说,进行转换的list.也就是category列表.
- dtype: 仅仅string和int被支持,其他的类型是无法进行这个操作的.
- default_value: 当不在vocabulary_list中的默认值,这时候num_oov_buckets必须是0.
- num_oov_buckets: 用来处理那些不在vocabulary_list中的值,如果是0,那么使用default_value进行填充;如果大于0,则会在[len(vocabulary_list), len(vocabulary_list)+num_oov_buckets]这个区间上重新计算当前特征的值.
1 | tf.feature_column.categorical_column_with_vocabulary_file( |
- vocabulary_file: 存储词汇表的文件名
- 其他参数的含义与
tf.feature_column.categorical_column_with_vocabulary_list相同
1 | # Given input "feature_name_from_input_fn" which is a string, |
上述代码得到的结果如下: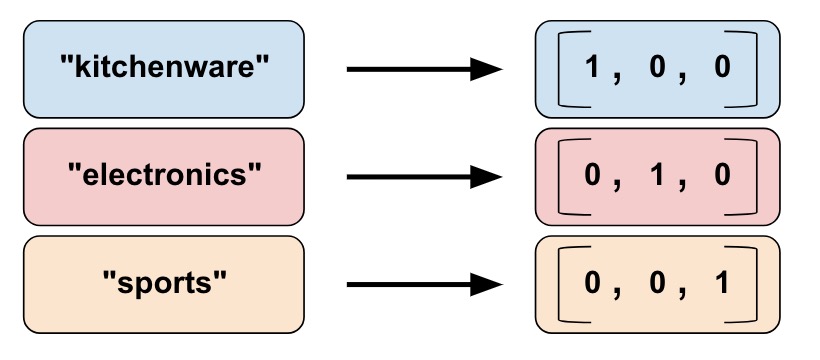
为了加深理解,进一步做一些测试:1
2
3
4
5
6
7
8
9
10
11
12
13
14
15
16
17
18
19
20
21
22
23def test_categorical_column_with_vocabulary_list():
color_data = {'color': [['R', 'R'], ['G', 'R'], ['B', 'G'], ['A', 'A']]} # 4行样本
builder = _LazyBuilder(color_data)
color_column = feature_column.categorical_column_with_vocabulary_list(
'color', ['R', 'G', 'B'], dtype=tf.string, default_value=-1
)
color_column_tensor = color_column._get_sparse_tensors(builder)
with tf.Session() as session:
session.run(tf.global_variables_initializer())
session.run(tf.tables_initializer())
print(session.run([color_column_tensor.id_tensor]))
# 将稀疏的转换成dense,也就是one-hot形式,只是multi-hot
color_column_identy = feature_column.indicator_column(color_column)
color_dense_tensor = feature_column.input_layer(color_data, [color_column_identy])
with tf.Session() as session:
session.run(tf.global_variables_initializer())
session.run(tf.tables_initializer())
print('use input_layer' + '_' * 40)
print(session.run([color_dense_tensor]))
test_categorical_column_with_vocabulary_list()
注意:
- input_layer: 只接受dense tensor
- tables_initializer: 在sparser的时候使用的,如果不进行初始化会出现 Table not initialized. [Node: hash_table_Lookup = LookupTableFindV2 这样的异常
结果如下:1
2
3
4
5
6
7
8
9
10
11
12
13[SparseTensorValue(indices=array([[0, 0],
[0, 1],
[1, 0],
[1, 1],
[2, 0],
[2, 1],
[3, 0],
[3, 1]], dtype=int64), values=array([ 0, 0, 1, 0, 2, 1, -1, -1], dtype=int64), dense_shape=array([4, 2], dtype=int64))]
use input_layer________________________________________
[array([[2., 0., 0.],
[1., 1., 0.],
[0., 1., 1.],
[0., 0., 0.]], dtype=float32)]
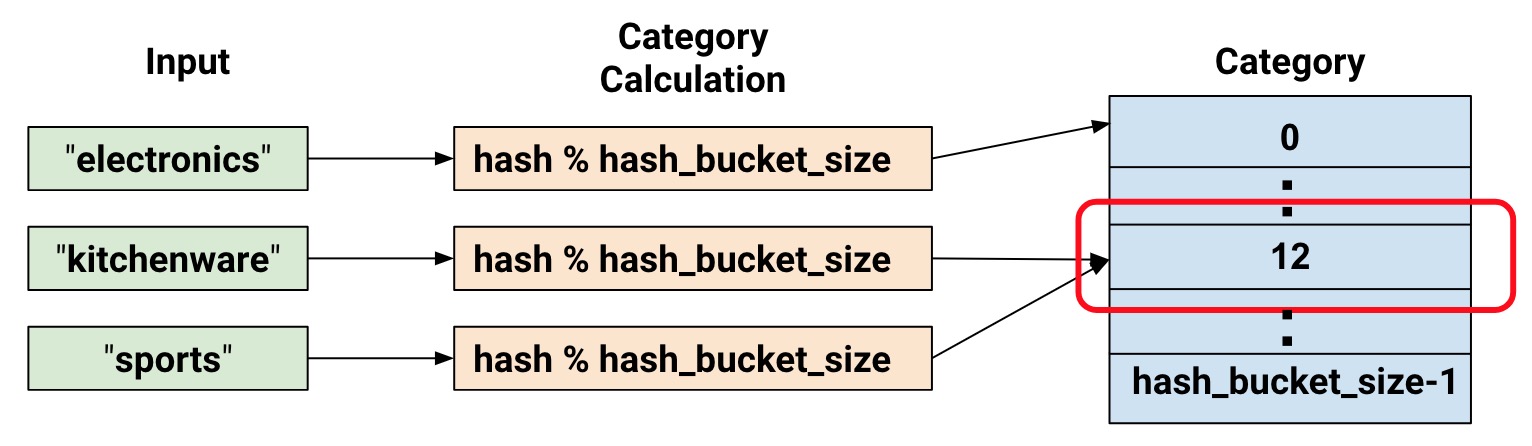
Hashed Column
为类别特征提供词汇表有时候会过于繁琐,特别是在词汇表非常大的时候,词汇表会非常消耗内存。tf.feature_column.categorical_column_with_hash_bucket允许用户指定类别的总数,通过hash的方式来得到最终的类别ID。伪代码如下:1
2# pseudocode
feature_id = hash(raw_feature) % hash_buckets_size
用hash的方式产生类别ID,不可避免地会遇到hash冲突的问题,即可有多多个原来不相同的类别会产生相同的类别ID。因此,设置hash_bucket_size参数会显得比较重要。实践表明,hash冲突不会对神经网络模型造成太大的影响,因为模型可以通过其他特征作进一步区分。
同样来做一些测试,看看最终效果。1
2
3
4
5
6
7
8
9
10
11
12
13
14
15
16
17
18
19
20
21def test_categorical_column_with_hash_bucket():
color_data = {'color': [[2], [5], [-1], [0]]} # 4行样本
builder = _LazyBuilder(color_data)
color_column = feature_column.categorical_column_with_hash_bucket('color', 7, dtype=tf.int32)
color_column_tensor = color_column._get_sparse_tensors(builder)
with tf.Session() as session:
session.run(tf.global_variables_initializer())
session.run(tf.tables_initializer())
print(session.run([color_column_tensor.id_tensor]))
# 将稀疏的转换成dense,也就是one-hot形式,只是multi-hot
color_column_identy = feature_column.indicator_column(color_column)
color_dense_tensor = feature_column.input_layer(color_data, [color_column_identy])
with tf.Session() as session:
session.run(tf.global_variables_initializer())
session.run(tf.tables_initializer())
print('use input_layer' + '_' * 40)
print(session.run([color_dense_tensor]))
test_categorical_column_with_hash_bucket()
运行结果如下:1
2
3
4
5
6
7
8[SparseTensorValue(indices=array([[0, 0],
[1, 0],
[3, 0]], dtype=int64), values=array([5, 1, 2], dtype=int64), dense_shape=array([4, 1], dtype=int64))]
use input_layer________________________________________
[array([[0., 0., 0., 0., 0., 1., 0.],
[0., 1., 0., 0., 0., 0., 0.],
[0., 0., 0., 0., 0., 0., 0.],
[0., 0., 1., 0., 0., 0., 0.]], dtype=float32)]
需要注意的是,使用hash bucket的时候,原始值中-1或者空字符串””会被忽略,不会输出结果。
Crossed column
交叉组合特征也是一种很常用的特征工程手段,尤其是在使用LR模型时。Crossed column仅仅适用于sparser特征,产生的依然是sparsor特征。1
2
3
4
5tf.feature_column.crossed_column(
keys,
hash_bucket_size,
hash_key=None
)
具体地,Crossed特征对keys的笛卡尔积执行hash操作,再把hash的结果对hash_bucket_size取模得到最终的结果:Hash(cartesian product of features) % hash_bucket_size。
测试代码如下:1
2
3
4
5
6
7
8
9
10
11
12
13
14
15
16def test_crossed_column():
""" crossed column测试 """
featrues = {
'price': [['A'], ['B'], ['C']],
'color': [['R'], ['G'], ['B']]
}
price = feature_column.categorical_column_with_vocabulary_list('price', ['A', 'B', 'C', 'D'])
color = feature_column.categorical_column_with_vocabulary_list('color', ['R', 'G', 'B'])
p_x_c = feature_column.crossed_column([price, color], 16)
p_x_c_identy = feature_column.indicator_column(p_x_c)
p_x_c_identy_dense_tensor = feature_column.input_layer(featrues, [p_x_c_identy])
with tf.Session() as session:
session.run(tf.global_variables_initializer())
session.run(tf.tables_initializer())
print(session.run([p_x_c_identy_dense_tensor]))
test_crossed_column()
结果:1
2
3
4[array([[0., 0., 0., 0., 0., 0., 0., 0., 1., 0., 0., 0., 0., 0., 0., 0.],
[0., 0., 0., 0., 0., 0., 0., 0., 0., 1., 0., 0., 0., 0., 0., 0.],
[0., 0., 0., 0., 0., 0., 0., 0., 0., 0., 0., 1., 0., 0., 0., 0.]],
dtype=float32)]
Indicator and embedding columns
Indicator columns 和 embedding columns 不能直接作用在原始特征上,而是作用在categorical columns上。
在前面的众多例子中,我们已经使用过indicator_column来把categorical column得到的稀疏tensor转换为one-hot或者multi-hot形式的稠密tensor,这里就不赘述了。
当某些特征的类别数量非常大时,使用indicator_column来把原始数据转换为神经网络的输入就变得非常不灵活,这时通常使用embedding column把原始特征映射为一个低维稠密的实数向量。同一类别的embedding向量间的距离通常可以用来度量类别直接的相似性。
Embedding column与indicator column之间的区别可以用下图表示。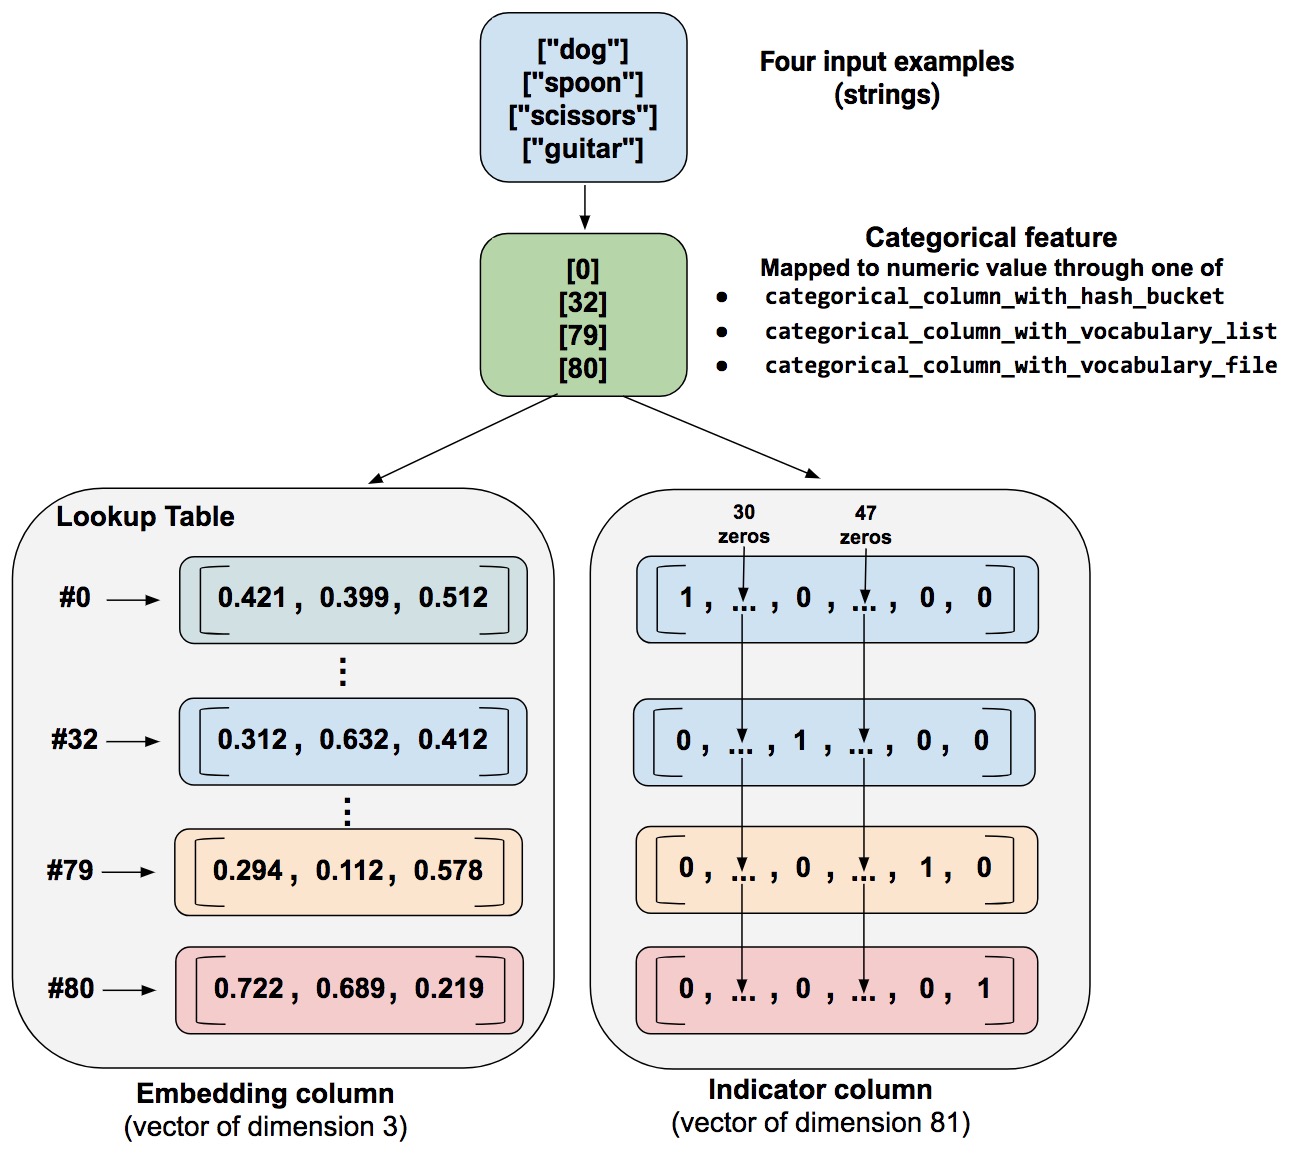
1 | tf.feature_column.embedding_column( |
- categorical_column: 使用categoryical_column产生的sparsor column
- dimension: 定义embedding的维数
- combiner: 对于多个entries进行的推导。默认是meam, 但是 sqrtn在词袋模型中,有更好的准确度。
- initializer: 初始化方法,默认使用高斯分布来初始化。
- tensor_name_in_ckpt: 可以从check point中恢复
- ckpt_to_load_from: check point file,这是在 tensor_name_in_ckpt 不为空的情况下设置的.
- max_norm: 默认是l2
- trainable: 是否可训练的,默认是true
测试代码:1
2
3
4
5
6
7
8
9
10
11
12
13
14
15
16
17
18
19
20def test_embedding():
tf.set_random_seed(1)
color_data = {'color': [['R', 'G'], ['G', 'A'], ['B', 'B'], ['A', 'A']]} # 4行样本
builder = _LazyBuilder(color_data)
color_column = feature_column.categorical_column_with_vocabulary_list(
'color', ['R', 'G', 'B'], dtype=tf.string, default_value=-1
)
color_column_tensor = color_column._get_sparse_tensors(builder)
color_embeding = feature_column.embedding_column(color_column, 4, combiner='sum')
color_embeding_dense_tensor = feature_column.input_layer(color_data, [color_embeding])
with tf.Session() as session:
session.run(tf.global_variables_initializer())
session.run(tf.tables_initializer())
print(session.run([color_column_tensor.id_tensor]))
print('embeding' + '_' * 40)
print(session.run([color_embeding_dense_tensor]))
test_embedding()
测试结果:1
2
3
4
5
6
7
8
9
10
11
12
13
14[SparseTensorValue(indices=array([[0, 0],
[0, 1],
[1, 0],
[1, 1],
[2, 0],
[2, 1],
[3, 0],
[3, 1]], dtype=int64), values=array([ 0, 1, 1, -1, 2, 2, -1, -1], dtype=int64), dense_shape=array([4, 2], dtype=int64))]
embeding________________________________________
[array([[-0.8339818 , -0.4975947 , 0.09368954, 0.16094571],
[-0.6342659 , -0.19216162, 0.18877633, 0.17648602],
[ 1.5531666 , 0.27847385, 0.12863553, 1.2628161 ],
[ 0. , 0. , 0. , 0. ]],
dtype=float32)]
从上面的测试结果可以看出不在vocabulary里的数据’A’在经过categorical_column_with_vocabulary_list操作时映射为默认值-1,而默认值-1在embeding column时映射为0向量,这是一个很有用的特性,可以用-1来填充一个不定长的ID序列,这样可以得到定长的序列,然后经过embedding column之后,填充的-1值不影响原来的结果。在下一篇文章中,我会通过一个例子来演示这个特性。
有时候在同一个网络模型中,有多个特征可能需要共享相同的embeding映射空间,比如用户历史行为序列中的商品ID和候选商品ID,这时候可以用到tf.feature_column.shared_embedding_columns。
1 | tf.feature_column.shared_embedding_columns( |
- categorical_columns 为需要共享embeding映射空间的类别特征列表
- 其他参数与embedding column类似
测试代码:1
2
3
4
5
6
7
8
9
10
11
12
13
14
15
16
17
18
19
20
21
22
23
24
25
26
27def test_shared_embedding_column_with_hash_bucket():
color_data = {'color': [[2, 2], [5, 5], [0, -1], [0, 0]],
'color2': [[2], [5], [-1], [0]]} # 4行样本
builder = _LazyBuilder(color_data)
color_column = feature_column.categorical_column_with_hash_bucket('color', 7, dtype=tf.int32)
color_column_tensor = color_column._get_sparse_tensors(builder)
color_column2 = feature_column.categorical_column_with_hash_bucket('color2', 7, dtype=tf.int32)
color_column_tensor2 = color_column2._get_sparse_tensors(builder)
with tf.Session() as session:
session.run(tf.global_variables_initializer())
session.run(tf.tables_initializer())
print('not use input_layer' + '_' * 40)
print(session.run([color_column_tensor.id_tensor]))
print(session.run([color_column_tensor2.id_tensor]))
# 将稀疏的转换成dense,也就是one-hot形式,只是multi-hot
color_column_embed = feature_column.shared_embedding_columns([color_column2, color_column], 3, combiner='sum')
print(type(color_column_embed))
color_dense_tensor = feature_column.input_layer(color_data, color_column_embed)
with tf.Session() as session:
session.run(tf.global_variables_initializer())
session.run(tf.tables_initializer())
print('use input_layer' + '_' * 40)
print(session.run(color_dense_tensor))
test_shared_embedding_column_with_hash_bucket()
测试结果:1
2
3
4
5
6
7
8
9
10
11
12
13
14
15
16
17not use input_layer________________________________________
[SparseTensorValue(indices=array([[0, 0],
[0, 1],
[1, 0],
[1, 1],
[2, 0],
[3, 0],
[3, 1]], dtype=int64), values=array([5, 5, 1, 1, 2, 2, 2], dtype=int64), dense_shape=array([4, 2], dtype=int64))]
[SparseTensorValue(indices=array([[0, 0],
[1, 0],
[3, 0]], dtype=int64), values=array([5, 1, 2], dtype=int64), dense_shape=array([4, 1], dtype=int64))]
<class 'list'>
use input_layer________________________________________
[[ 0.37802923 -0.27973637 0.11547407 0.75605845 -0.55947274 0.23094814]
[-0.5264772 0.86587846 -0.36023238 -1.0529544 1.7317569 -0.72046477]
[ 0. 0. 0. -0.9269535 -0.17690836 0.42011076]
[-0.9269535 -0.17690836 0.42011076 -1.853907 -0.35381672 0.8402215 ]]
需要注意的是,tf.feature_column.shared_embedding_columns的返回值是一个与参数categorical_columns维数相同的列表。
Weighted categorical column
有时候我们需要给一个类别特征赋予一定的权重,比如给用户行为序列按照行为发生的时间到某个特定时间的差来计算不同的权重,这是可以用到weighted_categorical_column。1
2
3
4
5tf.feature_column.weighted_categorical_column(
categorical_column,
weight_feature_key,
dtype=tf.float32
)
测试代码:1
2
3
4
5
6
7
8
9
10
11
12
13
14
15
16
17def test_weighted_categorical_column():
color_data = {'color': [['R'], ['G'], ['B'], ['A']],
'weight': [[1.0], [2.0], [4.0], [8.0]]} # 4行样本
color_column = feature_column.categorical_column_with_vocabulary_list(
'color', ['R', 'G', 'B'], dtype=tf.string, default_value=-1
)
color_weight_categorical_column = feature_column.weighted_categorical_column(color_column, 'weight')
builder = _LazyBuilder(color_data)
with tf.Session() as session:
id_tensor, weight = color_weight_categorical_column._get_sparse_tensors(builder)
session.run(tf.global_variables_initializer())
session.run(tf.tables_initializer())
print('weighted categorical' + '-' * 40)
print(session.run([id_tensor]))
print('-' * 40)
print(session.run([weight]))
test_weighted_categorical_column()
测试结果:1
2
3
4
5
6
7
8
9
10weighted categorical----------------------------------------
[SparseTensorValue(indices=array([[0, 0],
[1, 0],
[2, 0],
[3, 0]], dtype=int64), values=array([ 0, 1, 2, -1], dtype=int64), dense_shape=array([4, 1], dtype=int64))]
----------------------------------------
[SparseTensorValue(indices=array([[0, 0],
[1, 0],
[2, 0],
[3, 0]], dtype=int64), values=array([1., 2., 4., 8.], dtype=float32), dense_shape=array([4, 1], dtype=int64))]
可以看到,相对于前面其他categorical_column来说多了weight这个tensor。weighted_categorical_column的一个用例就是,weighted_categorical_column的结果传入给shared_embedding_columns可以对ID序列的embeding向量做加权融合。限于篇幅的原因,完整的使用案例请期待下一篇博文。